> ## Documentation Index
> Fetch the complete documentation index at: https://docs.lantern.is/llms.txt
> Use this file to discover all available pages before exploring further.
# Tag Customers with Shopify Flow
> Learn how to automatically tag customers with their loyalty tier using Shopify Flow
This guide will help you set up a flow using [Shopify's Flow app](https://apps.shopify.com/flow) to automatically tag customers with their current Loyalty Tier. This can be helpful for bringing Lantern customer statuses into apps that don't have metafield support. You can also use these workflows as starting points for other automations.
## Getting Started
We'll use three different Flow workflows to update a Customer's tags:
1. When a Lantern Customer Account is created
2. When orders are placed (to add tags to any current customers that aren't tagged yet)
3. When Lantern sends a **Tier Changed** event
We'll create the first workflow manually to walk you through how to create Flows using Lantern data.
## Add a Tag When a Customer Creates an Account
1. Navigate to the **Flow** app in your Shopify Admin
* You can find it by clicking the **Apps** heading in the left navigation and searching for `Flow`
* If you don't see **Flow** in your installed apps list, you may need to install it from the [Shopify App Store](https://apps.shopify.com/flow)
2. Click the **Create Workflow** button in the top right of your screen
3. Click the **Select a Trigger** button
4. Choose **Lantern** from the list of Installed App triggers
5. Select the **Lantern Account Created** trigger
6. Click the blue Plus icon on the card that appears
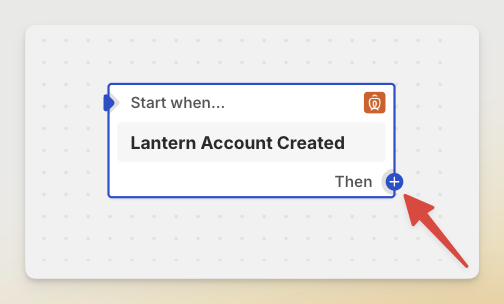 7. Select **Action** from the menu
8. Choose **Shopify** from the list of Installed Apps actions
9. Select the **Add customer tags** action
* If you can't find the action, try searching for `tags` in the **Search Shopify** field
10. Type (or copy and paste) `LANTERN:TIER:` into the **Tags** input that appears on the right side of the screen
* 🔔 To make working with tags easier in other Flows, we recommend following this specific structure for your tags
11. Click the **Variable** icon on the right side of the input
12. Type `metafield` into the **Search** input and select the **customer / Metafield** option
7. Select **Action** from the menu
8. Choose **Shopify** from the list of Installed Apps actions
9. Select the **Add customer tags** action
* If you can't find the action, try searching for `tags` in the **Search Shopify** field
10. Type (or copy and paste) `LANTERN:TIER:` into the **Tags** input that appears on the right side of the screen
* 🔔 To make working with tags easier in other Flows, we recommend following this specific structure for your tags
11. Click the **Variable** icon on the right side of the input
12. Type `metafield` into the **Search** input and select the **customer / Metafield** option
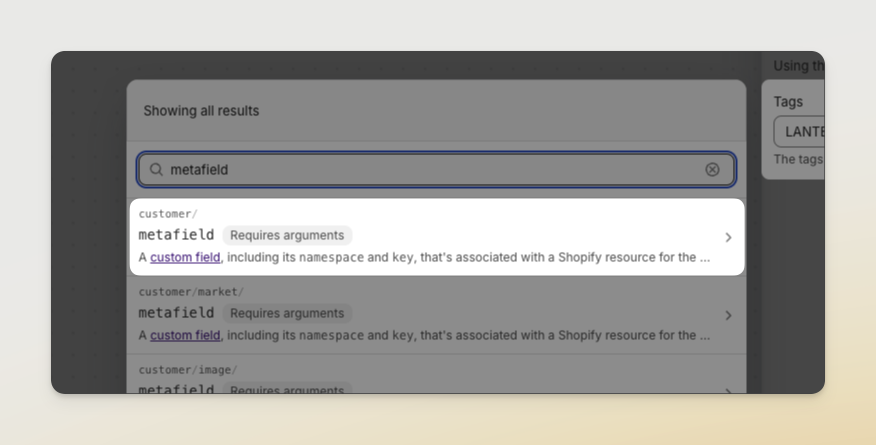 13. Click the **Select a metafield** dropdown and choose the **Loyalty Tier** metafield from the list
14. Click the **Add** button
15. Select the **value** item from the list (it should be the only option available)
16. You should now see `LANTERN:TIER:#{{customer.loyaltyTier.value}}` in the **Tags** field
17. Click into the input and press **Enter** on your keyboard or select the **Add** action from the popover that appears
* You should see your entry appear underneath the input where it says `The tags to add to the customer`
18. At the top of the screen, write a descriptive name for this workflow like `Add Lantern Tier Tag on Customer Create`
19. Click the **Turn on workflow** button in the top right to enable your workflow
20. When you're ready to leave, click the **Exit** button in the top left
* If you're not ready to turn on your workflow yet, you can leave and Flow will save your draft workflow for you
## Import the Remaining Workflows
Now that we've walked through the steps of creating your own Flow, we can speed things along by importing templated workflows for the other steps. We've provided all three workflows here for you.
If you already manually created the **On Customer Create** workflow, you can skip importing the first file.
Download the workflow for adding tier tags when customers are created.
Download the workflow for adding tier tags on orders.
Download the workflow for updating tier tags when tiers change.
Once you've downloaded the workflows you want to use, follow these steps to import them:
1. Navigate to the **Flow** app in your Shopify Admin
2. Click the **Import** action in the top right
3. Click the **Add files** button and select the workflow files you downloaded earlier
4. Click the **Import** button
Imported workflows are added as drafts. Review the steps before enabling them.
5. Your new workflows should appear in your Workflows list
6. Navigate to one of the newly added workflows and review it
7. When you're ready, click the **Turn on workflow** button in the top right
8. Repeat these steps with the remaining workflows
13. Click the **Select a metafield** dropdown and choose the **Loyalty Tier** metafield from the list
14. Click the **Add** button
15. Select the **value** item from the list (it should be the only option available)
16. You should now see `LANTERN:TIER:#{{customer.loyaltyTier.value}}` in the **Tags** field
17. Click into the input and press **Enter** on your keyboard or select the **Add** action from the popover that appears
* You should see your entry appear underneath the input where it says `The tags to add to the customer`
18. At the top of the screen, write a descriptive name for this workflow like `Add Lantern Tier Tag on Customer Create`
19. Click the **Turn on workflow** button in the top right to enable your workflow
20. When you're ready to leave, click the **Exit** button in the top left
* If you're not ready to turn on your workflow yet, you can leave and Flow will save your draft workflow for you
## Import the Remaining Workflows
Now that we've walked through the steps of creating your own Flow, we can speed things along by importing templated workflows for the other steps. We've provided all three workflows here for you.
If you already manually created the **On Customer Create** workflow, you can skip importing the first file.
Download the workflow for adding tier tags when customers are created.
Download the workflow for adding tier tags on orders.
Download the workflow for updating tier tags when tiers change.
Once you've downloaded the workflows you want to use, follow these steps to import them:
1. Navigate to the **Flow** app in your Shopify Admin
2. Click the **Import** action in the top right
3. Click the **Add files** button and select the workflow files you downloaded earlier
4. Click the **Import** button
Imported workflows are added as drafts. Review the steps before enabling them.
5. Your new workflows should appear in your Workflows list
6. Navigate to one of the newly added workflows and review it
7. When you're ready, click the **Turn on workflow** button in the top right
8. Repeat these steps with the remaining workflows